The Firebase integration is available on the [Starter](🔗) plan.
This extension uses Firebase services as your RevenueCat backend for in-app purchases on Apple App Store, Google Play Store, and Amazon Appstore to control access to premium content and sync customer purchase information to Firestore. For example, you might want to:
Store purchase lifecycle events (e.g., trial starts, purchases, subscription renewals, billing issues) in Firestore and react to them.
Store and update information about customers and their purchases in Firestore.
Update information about customers' entitlements as Firebase Authentication [Custom Claims](🔗).
This Firebase integration has 2 parts that can be used independently of each other: Google Analytics and Firebase Extension. The Google Analytics portion of this integration allows RevenueCat to send subscription lifecycle events to Firebase Analytics / Google Analytics. The Firebase Extension allows RevenueCat to store and update customer information in a Cloud Firestore collection and set custom claims on a user's auth token to check active entitlement status.
Each part of the integration requires additional setup, which you can see outlined in the table below.
| Integration | What's required |
| Google Analytics | ✅ `$firebaseAppInstanceId` subscriber attribute
❌ (optional, but highly recommended) Setting Firebase user identity |
| Firebase Extension | ✅ Setting Firebase user identity |
# 1. Set up Firebase services in your project
Before installing this extension, set up the following Firebase services in your Firebase project.
(optional) [Cloud Firestore](🔗) to store In-App Purchases & Subscriptions details.
Follow the steps in the [documentation](🔗) to create a Cloud Firestore database.
(optional) [Firebase Authentication](🔗) to enable different sign-up options for your users to enable Custom Claims management.
Enable the sign-in methods in the [Firebase console](🔗) that you want to offer your users.
Invalid API Version
When connecting to Firebase, it's possible that you may see an error like:
"Invalid API Version", with a couple of different version numbers. This is fixed as part of an automatic upgrade process when installing the extension, and generally doesn't indicate there being an issue with your setup.
# 2. Set Firebase User Identity in RevenueCat
You should make sure to use the Firebase UID as the RevenueCat app user ID when setting the Firebase user identity in RevenueCat. This step is optional, but highly recommended as a best practice for the Google Analytics portion of this integration. The Firebase Extension portion **requires** this step to be completed.
# 3. Send analytics events to Google Analytics
In order to send subscriber lifecycle events to Google Analytics, you must set the `$firebaseAppInstanceId` as a subscriber attribute for your users and enable the integration from the RevenueCat integration settings page.
## Set `$firebaseAppInstanceId` as a subscriber attribute
Please ensure you're getting the app instance ID from the [Firebase Analytics](🔗) package.
Setting an incorrect app instance ID will prevent events from displaying in Google Analytics.
## Enable Google Analytics
You can "turn on" the integration from the RevenueCat dashboard.
Navigate to your project in the RevenueCat dashboard and find the _Integrations_ card in the left menu. Select **+ New**

Choose **Firebase** from the integrations menu

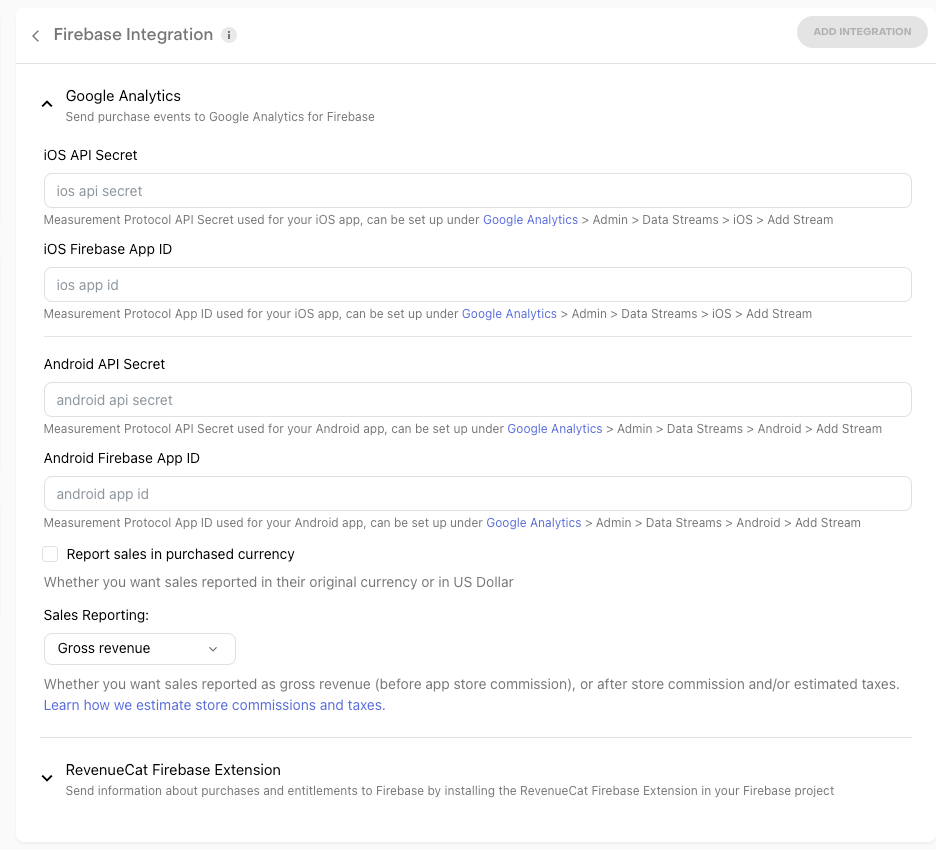
Firebase Google Analytics configuration screen
Add your Firebase App ID and API secret for your iOS app and/or Android app
To set up your Firebase App ID, navigate to Google Analytics > Admin > Data Streams > iOS/Android > Add Stream. Open the App Stream to find your Firebase App ID. Copy and paste into the RevenueCat settings page.

Data stream details page
To find your API secret, in the same _App stream details_ page select "Measure Protocol API secrets". Create an API secret. Copy and paste into the RevenueCat settings page.
Measurement Protocol API secrets page
Select whether you want RevenueCat to report sales in purchased currency (original currency or in US dollar)
Select whether you want sales reported as gross revenue (before app store commission), or after store commission and/or estimated taxes.
Remember to select 'Add Integration'.
## Events
The Google Analytics portion of the Firebase integration tracks the following events:
| Event Type | Default Event Name | Description | App Store | Play Store | Amazon | Stripe | Promo |
| Initial Purchase | purchase | A new subscription has been purchased. | ✅ | ✅ | ✅ | ✅ | ❌ |
| Trial Started | rc_trial_start | The start of an auto-renewing subscription product free trial. | ✅ | ✅ | ✅ | ✅ | ❌ |
| Renewal (incl. trial conversion) | purchase | An existing subscription has been renewed or a lapsed user has resubscribed. | ✅ | ✅ | ✅ | ✅ | ❌ |
| Cancellation (incl. during trial) | rc_cancellation | A subscription or non-renewing purchase has been cancelled. See [cancellation reasons](🔗) for more details. | ✅ | ✅ | ✅ | ✅ | ✅ |
| Uncancellation | rc_uncancellation | A non-expired cancelled subscription has been re-enabled. | ✅ | ✅ | ✅ | ❌ | ❌ |
| Non Subscription Purchase | purchase | A customer has made a purchase that will not auto-renew. | ✅ | ✅ | ✅ | ✅ | ✅ |
| Subscription Paused | rc_subscription_paused | A subscription has been paused. | ❌ | ✅ | ❌ | ❌ | ❌ |
| Expiration | rc_expiration | A subscription has expired and access should be removed. If you have [Platform Server Notifications](🔗) configured, this event will occur as soon as we are notified (within seconds to minutes) of the expiration. If you do not have notifications configured, delays may be approximately 1 hour. | ✅ | ✅ | ✅ | ✅ | ✅ |
| Billing Issue | rc_billing_issue | There has been a problem trying to charge the subscriber. This does not mean the subscription has expired. Can be safely ignored if listening to CANCELLATION event + cancel_reason=BILLING_ERROR. | ✅ | ✅ | ✅ | ✅ | ❌ |
| Product Change | rc_product_change | A subscriber has changed the product of their subscription. This does not mean the new subscription is in effect immediately. See [Managing Subscriptions](🔗) for more details on updates, downgrades, and crossgrades. | ✅ | ✅ | ❌ | ✅ | ❌ |
| Transfer | rc_transfer_event | A transfer of transactions and entitlements was initiated between one App User ID(s) to another. | ✅ | ✅ | ✅ | ✅ | ❌ |
## Testing Google Analytics
### Make a sandbox purchase with a new user
Simulate a new user installing your app, and go through your app flow to complete the [sandbox purchase](🔗).
### Check Google Analytics Dashboard
Navigate to Google Analytics > Reports > Realtime. Here you will be able to confirm events have been successfully dispatched to Google Analytics. It can take up to a few seconds or minutes for your events to appear.

Google Analytics dashboard
## Firebase A/B Testing
While these events will appear in Firebase, Google does not allow events that are submitted via the Google Analytics 4 Measurement Protocol API to be used with Firebase A/B testing at this time. Since the integration uses this API, these events are not yet compatible with Firebase A/B Testing.
You have completed the Google Analytics setup! You can stop here or continue with the rest of the documentation to learn how to set up the Firebase Extension.
# 4. Send customer information to Firestore
## Prerequisites
This section outlines steps that need to be completed in order to enable the Firebase Extension portion of this integration.
### Billing
Your Firebase project must be on the Blaze (pay-as-you-go) plan to install an extension.
You will be charged a small amount (typically around $0.01/month) for the Firebase resources required by this extension (even if it is not used). In addition, this extension uses the following Firebase services, which may have associated charges if you exceed the service's free tier for low-volume use ([Learn more about Firebase billing](🔗)):
Cloud Firestore
Cloud Functions
### Set your Cloud Firestore security rules
Set your security rules so that only authenticated users can access customer information, and that each user can only access their own information.
## Enable Firebase Extension
You can install this extension either through the [Firebase Console](🔗) or [CLI](🔗) on your OS.
### Install Firebase Extension through Firebase Console
Follow [this installation link](🔗) to start the installation prompts on Firebase Console.
Select 'I acknowledge'

If your account is not set up for billing yet, select 'Upgrade project to continue'

Enable Authentication and Secret Manager by selecting 'Enable', then select 'Next'

Select 'Next'

Configure the extension

Select a Cloud Functions location
(optional) Give a name to the Firestore collection where "events" will be stored
(optional) Give a name to the Firestore collection where "customers" will be stored
Enable or disable custom claims set in Firebase Auth with user's active entitlements. If set to “ENABLED”, the extension will consider the `
app_user_id` of the user to match the user’s Firebase Authentication UID and set a “Custom Claim” with their current active entitlementsEnter your RevenueCat Firebase Integration Shared Secret. This can be found in the RevenueCat Firebase Extension settings page. Select 'Generate shared secret' and copy it. Paste the generated shared secret in the installation prompt.

(optional) Enable events to write custom event handlers via [Eventarc](🔗)

#### Available Events:
| Event | Description |
`test` | Occurs whenever a test event issued through the RevenueCat dashboard. |
`initial_purchase` | Occurs whenever a new subscription has been purchased or a lapsed user has resubscribed. |
`non_renewing_puchase` | Occurs whenever a customer has made a purchase that will not auto-renew. |
`renewal ` | Occurs whenever an existing subscription has been renewed. |
`product_change` | Occurs whenever a subscriber has changed the product of their subscription. |
`cancellation` | Occurs whenever a subscription or non-renewing purchase has been cancelled. See cancellation reasons for more details. |
`uncancellation ` | Occurs whenever an auto-renew status has been re-enabled for a subscription. |
`billing_issue` | Occurs whenever there has been a problem trying to charge the subscriber. This does not mean the subscription has expired. |
`subscriber_alias` | Deprecated. Occurs whenever a new app_user_id has been registered for an existing subscriber. |
`subscription_paused` | Occurs whenever a subscription has been paused. |
`transfer ` | Occurs whenever a transfer of transactions and entitlements was initiated between one App User ID(s) to another. |
`expiration ` | Occurs whenever a subscription has expired and access should be removed. |
Select 'Install extension'. This will take about 3-5 minutes to complete
Once the extension is installed, navigate to Firebase > Functions in the sidebar. Copy the 'Trigger URL' and paste this into the RevenueCat Firebase Extension settings page.


Remember to select 'Save'
You have successfully installed your instance of Enable In-App Purchases with RevenueCat! Skip to [Testing Firebase Extension](🔗) section of the docs.
### Install Firebase Extension through CLI
If you installed the Firebase Extension through the Firebase Console, skip to [Testing Firebase Extension](🔗) of the docs.
This portion of the installation is done through the command-line interface (CLI). Clone this [Github repo](🔗) and open the CLI for your respective operating system.
Run `
firebase ext:install . --project [project-id]` To find your `project-id`, go to your [Firebase console](🔗). Select your project and navigate to Project settings to copy the ID and replace `[project-id]` in the command.


For the next 2 `
Do you wish to continue?` prompts, press `y`

`
Please enter a new name for this instance:` Give the extension a name of your choice

`
Which option do you want enabled for this parameter (Cloud Functions location)?` Select your desired location

`
Enter a value for RevenueCat Webhook Events Firestore collection:` Give a name to the Firestore collection where "events" will be stored. If left blank, RevenueCat will not save events.

`
Enter a value for location of the customers collection:` Give a name to the Firestore collection where the customer information will be stored. If left blank, RevenueCat will not save customer information.

`
Which option do you want enabled for this parameter (custom claims set in Firebase Auth with the user's active entitlements):` If you want to use the custom claims feature, which allows for automatic checking for Entitlements, select `ENABLED`.

`
Enter a value for RevenueCat Firebase Integration Shared Secret:` This can be found in the RevenueCat Firebase Extension settings page. Select 'Generate shared secret' and copy it. Paste the generated shared secret in the installation prompt.

RevenueCat Firebase Extension page

Wait about 3 to 5 minutes for the installation

Once the extension is installed, navigate to Firebase > Functions in the sidebar. Copy the 'Trigger URL' and paste this into the RevenueCat Firebase Extension settings page.
#### Note about the App User ID's in the Customers collection
The document ID's in the Customers collection will always be an App User ID. Specifically, it will be the customer's most recently active alias. This means that the document ID for each customer may switch between [anonymous ID's](🔗) and [custom ID's](🔗), if they are both used in your app. If you would like to only use custom ID's, you can [learn more about that here](🔗).
Remember to select 'Save'.
You have successfully installed your instance of Enable In-App Purchases with RevenueCat!
## Testing Firebase Extension
### Make a sandbox purchase with a new user
Simulate a new user installing your app, and go through your app flow to complete the [sandbox purchase](🔗).
### Check that the Firebase event delivered successfully
While still on the Customer View, select the purchase event in the [Customer History](🔗) page and make sure that the Firebase (Firebase function) integration event exists and was delivered successfully.

### Check Firestore Database Collections
Navigate to your Firebase dashboard > Firestore Database to find events sent for your collections.

Customers collection

Events collection
## Sample Events
Below are sample JSONs that are delivered to Firestore Database for each event type.
## Using the Extension
### Checking Entitlement access
To check access to entitlements, you can either [use the RevenueCat SDK](🔗) or use Firebase Authentication custom claims. For example, to check whether the current user has access to an entitlement called `premium`, you could use the following Firebase code:
### List a user's active subscriptions
To list a user's active subscriptions, you could use the following Firebase code:
### React to subscription lifecycle events
Subscription lifecycle events get stored as events in the Firestore collection `${param:REVENUECAT_EVENTS_COLLECTION}`. By listening to changes in this collection, for example, through [Cloud Firestore triggered Firebase Cloud Functions](🔗), you can trigger any custom behavior that you want. An example could be sending push notifications to customers with billing issues to prompt them to update their credit cards. To do that, you would:
Store a push notification token for each of your app users, e.g., using [Firebase Cloud Messaging](🔗)
Create a new Cloud Function triggered whenever a new document is created in the `
${param:REVENUECAT_EVENTS_COLLECTION}` collectionIn the Cloud Function, determine if the `
type` field of the new document is `"BILLING_ISSUE"`If so, look up the app user ID from the `
app_user_id` field of the new documentLook up the push token for that app user ID and send a push notification
# Troubleshooting your Firebase integration
## 403 Permission denied to enable service [eventarcpublishing.googleapis.com]
If you get a 403 error in DeploymentManager when trying to install or uninstall the Firebase extensions, Navigate to [Google Cloud IAM Settings](🔗) and follow these steps:
Near the top left corner of the page, click **Grant Access**.
Once the "Grant Access" popup shows up on the right side of the page, set `
<PROJECT_NUMBER>@cloudservices.gserviceaccount.com` as the principal (replacing \<PROJECT_NUMBER> with your actual project number.)Select the **Editor** role.
Click Save.
Now try uninstalling and/or reinstalling the extension.

## InvalidApiVersionError: The version of this extension is not the same.
This is fixed as part of an automatic upgrade process when installing the extension, and generally doesn't indicate there being an issue with your setup. The error should not affect your integration. This is usually not necessary but if you continue seeing this error you may try to uninstall and reinstall the extension.